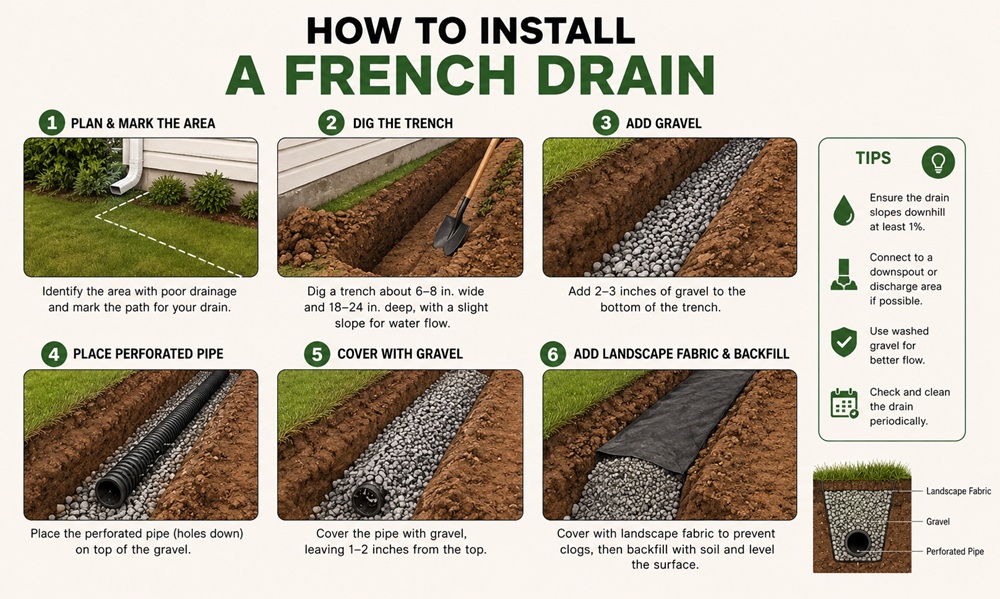
A french drain redirects water away from areas where it pools or threatens your foundation, using a gravel filled trench and a perforated pipe to carry groundwater to a safer discharge point. It’s a project many homeowners can tackle themselves with the right planning, though the amount of digging involved means it’s worth understanding the full process before committing a weekend to it.
What a French Drain Actually Does
The system works by giving water an easier path to follow than soaking into the ground near your home. A perforated pipe sits inside a gravel filled trench, usually wrapped in landscape fabric to keep soil and debris from clogging the pipe over time. Water in the surrounding soil moves into the gravel, enters the pipe through the perforations, and travels along the trench’s slope toward a discharge point away from your house.
This makes french drains particularly useful for yards with low spots that stay soggy after rain, basements with recurring moisture problems along one wall, or areas near a foundation where water consistently pools instead of draining away naturally.
Planning the Route Before You Dig
Start by identifying where the water problem actually originates and where it needs to end up. The trench needs a consistent downward slope, generally around one inch of drop for every eight to ten feet of trench length, so water flows by gravity rather than sitting stagnant in the pipe. Without adequate slope, the drain won’t function properly regardless of how well everything else is installed.
The discharge point matters just as much as the starting point. Water needs somewhere to go that won’t simply create a new problem, such as a storm drain connection where permitted, a dry well, a natural slope leading away from the house, or a rain garden designed to absorb runoff gradually. Before digging anywhere near your property line or existing utilities, calling your local utility locating service to mark buried lines is a necessary step, not an optional precaution.
Materials You’ll Need
A typical french drain project requires a perforated PVC pipe, usually four inches in diameter, landscape fabric to wrap the pipe and line the trench, washed gravel to fill around the pipe, and a method of covering the trench such as soil, sod, or decorative stone depending on the look you want in that area of the yard. A pop up emitter or above ground discharge fitting is needed at the end point if the water is being released at the surface rather than into an existing drainage system.
For the digging itself, a trenching shovel makes the work considerably easier than a standard flat shovel, and for longer runs, renting a trencher can save significant time and physical effort compared to digging entirely by hand.
Step by Step Installation Process
Begin by marking the planned trench route with spray paint or stakes, then dig a trench roughly six to eight inches wide and at least eight to twelve inches deep, adjusting depth based on how much water the area needs to handle and how deep the problem source sits.
Line the trench with landscape fabric, leaving enough excess on each side to wrap over the top later. This step keeps soil from migrating into the gravel and eventually clogging the system.
Add a two to three inch layer of gravel at the bottom of the trench, then lay the perforated pipe on top with the holes facing downward in most configurations, since this allows water to enter from the sides and bottom while reducing the chance of debris falling directly into the perforations from above.
Cover the pipe with additional gravel, filling to within a few inches of the surface, then fold the excess landscape fabric over the top of the gravel to fully enclose it before adding your final layer of soil, sod, or decorative covering.
Test the system before fully covering it by running a hose at the uphill end and confirming water flows through and exits properly at the discharge point. This is the easiest point to catch a slope problem or a blockage, long before the trench is backfilled and harder to access.
Common Mistakes That Cause French Drains to Fail
Insufficient slope is the most frequent cause of a french drain that doesn’t work as expected, since even a well built system won’t drain properly if water has nowhere to flow toward. Skipping landscape fabric, or using a cheap version that degrades quickly, leads to silt and soil infiltrating the gravel and pipe over several years, gradually reducing how well the system drains.
Choosing a discharge point that simply moves water to another problem area, like redirecting it toward a neighbor’s yard or a low spot that floods anyway, defeats the purpose of the project even if the trench itself is installed correctly.
When to Bring in a Professional
Simple surface drainage issues in a small yard are generally manageable as a DIY project over a weekend or two. Larger systems, drains that need to tie into municipal storm systems, installations near a foundation requiring careful grading, or yards with significant underground utilities are situations where hiring a licensed landscaper or drainage contractor reduces the risk of costly mistakes. The cost of professional installation is usually easier to justify once the project scope grows beyond a single, relatively short trench.
Adjusting the Project for Your Climate and Soil
Soil type has a significant effect on how well a french drain performs. Clay heavy soil drains poorly on its own, which is often exactly why water pools in the first place, and a trench dug through clay benefits from a slightly wider gravel bed to give water more room to move before reaching the pipe. Sandy soil drains more readily to begin with, which sometimes means a french drain is less necessary, though it can still help in cases where water needs to be redirected rather than simply absorbed.
In regions with harsh winters, trench depth matters for another reason beyond drainage capacity. Burying the pipe below the frost line in colder climates helps prevent the water inside from freezing and blocking flow during the coldest months, which is worth factoring into your depth calculations alongside the water volume the drain needs to handle.
Maintaining a French Drain After Installation
A properly installed french drain requires relatively little upkeep, but it isn’t entirely maintenance free. Checking the discharge point periodically to confirm water is still exiting freely catches blockages before they become a bigger problem. Over several years, sediment can still work its way into the system even with landscape fabric in place, particularly if the fabric wasn’t high quality or was damaged during installation.
If water starts pooling in the same area again after months or years of the drain working properly, it’s usually a sign that either the pipe has become partially clogged or the discharge point has become blocked, both of which are generally easier to inspect and clear than starting the entire project over.
Leave a Reply