
Before you pick up a shovel, call your local utility marking service. In the United States that’s 811, and the service is free. Hitting a buried gas, electric, or water line turns a weekend drainage project into an emergency, so get the lines flagged and wait for the marks.
Once that’s handled, learning how to make a French drain is mostly a matter of getting four things right. You need the trench in the right place, a steady slope, clean gravel wrapped in fabric, and an outlet that actually takes the water. Everything else is digging.
This guide walks through the whole job in the order you’ll do it, from planning to the finished surface.
What you’ll need
Gather everything before you start. Running out of gravel halfway through a trench is no fun.
- A flat shovel and a pointed shovel, or a rented trencher for a long run
- Perforated drain pipe, usually four inches in diameter for residential work
- Solid, non-perforated pipe if the line has to travel to a distant outlet
- Washed drainage gravel, commonly in a size around three quarters of an inch to an inch and a half
- Non-woven landscape or filter fabric, wide enough to wrap the full trench with overlap
- A string line, stakes, and a line level or a long level with a straight board
- A wheelbarrow, work gloves, and eye protection
- Pipe connectors and end caps that match your pipe
Ask the supplier how much gravel to order. They can calculate it from your trench length, width, and depth, and it’s better to have a little extra than to make a second trip.
Plan the route first
Walk the yard after a rain and watch where the water goes. The drain should sit along the path that water actually takes, usually at the base of a slope or along the edge of the area that stays wet. Putting it where you think water should go, rather than where it does, is the most common planning mistake.
Then decide where the water will exit. The outlet needs to be lower than the starting point of the drain, and it should empty somewhere that can handle the flow. A sloped section of your own property, a pop-up emitter, a dry well, or a permitted connection to a storm system are the usual options. Never point it at a neighbor’s yard, a septic field, or the foundation of your house. Local rules vary, so check whether permits apply before you commit to a route.
Stake the path and run string along it. If the ground is level, you’ll create the slope by digging the trench gradually deeper toward the outlet.
Dig the trench
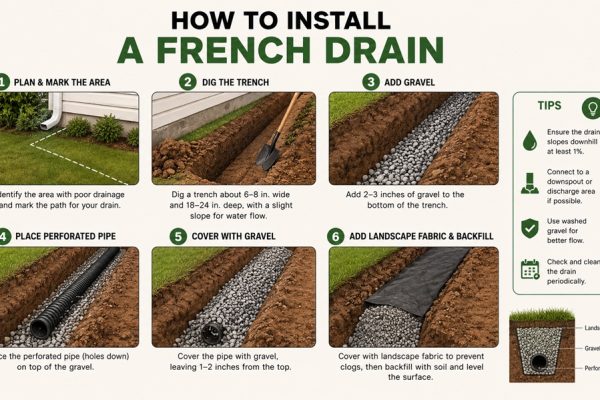
Set the width and depth
A trench between six and twelve inches wide suits most residential drains, with a depth that depends on the job. A shallow drain catching surface runoff might be a foot deep. A drain intercepting groundwater often goes deeper. The pipe plus several inches of gravel on top and a few below sets your minimum.
Build in the slope
The pipe needs to fall toward the outlet. A widely used guideline is about one percent, which is roughly an eighth of an inch of drop for every foot of length. For a forty-foot run, that’s around five inches from start to finish. Use your string and level to check the trench bottom as you dig, and measure from the string rather than guessing. Small dips collect water, so smooth the bottom as you go.
Handle the soil
Place the dug-up soil on a tarp or in a wheelbarrow rather than piling it on the lawn. You’ll use some of it to cover the finished drain, and a tarp makes cleanup much easier.
Line the trench with fabric
Lay the filter fabric across the bottom and up both sides, leaving enough extra on each side to fold back over the top later. Press it into the corners without tearing it. The fabric keeps silt out of the gravel, which is what keeps the drain working after the first few seasons.
Use non-woven fabric made for drainage. Plastic sheeting, which blocks water, doesn’t belong here.
Add the first layer of gravel
Pour about two to three inches of gravel into the bottom of the trench and spread it evenly. This bed supports the pipe and helps keep the slope consistent. Check the slope again after spreading, because gravel sometimes shifts the grade slightly.
Lay the pipe
Set the perforated pipe on the gravel bed. Many installers place the holes facing down, though some pipe products specify a different orientation, so read the instructions that come with yours. Connect sections with the proper couplings and make sure joints are snug.
Where the drain leaves the wet area and heads toward the outlet, you can switch to solid pipe. This carries the water without collecting more along the way. Cap any dead end on the uphill side so gravel doesn’t enter the pipe.
Before you cover anything, check the pipe with your level one more time. A quick test with a bit of water poured in at the high end will show whether it flows freely toward the outlet.
Cover the pipe with gravel
Add gravel around and over the pipe until it’s covered by several inches. Don’t compact it hard, since you want those open spaces for water to move through. Leave room near the top of the trench for fabric and a final layer of soil or stone.
Fold the fabric over
Bring the extra fabric from each side across the top of the gravel so the edges overlap, like wrapping a burrito. This completely encloses the gravel and pipe, protecting the system from soil that would otherwise filter in from above.
Finish the surface
You have a few options for the top, and the choice depends on what you want the yard to look like.
- Cover the fabric with a few inches of soil and reseed or lay sod, which blends the drain into a lawn
- Add a layer of decorative river rock for a visible, finished dry creek look
- Leave a strip of gravel exposed in a utility area where appearance isn’t a concern
If you’re covering with soil, keep it slightly mounded, because it will settle over time. Avoid heavy vehicle traffic on top of the drain, especially in the first season.
Mistakes that cause trouble later
A few errors show up again and again.
Skipping the fabric might save money on the day, but silt can gradually clog the gravel and shorten the drain’s life. Using the wrong rock matters too. Pea gravel and crushed stone with fine dust pack tightly and slow water down, while clean washed stone leaves open gaps.
Flat or backward slope is another frequent problem. If any section of the pipe sags below the ones after it, water stops moving and sediment builds up. Taking time with the string and level while the trench is open is much easier than fixing it later.
Poor outlet planning is the last big one. A beautifully built drain that dumps into soggy ground simply backs up. Make sure the water leaves the system and has a place to go.
Finally, planting thirsty trees or shrubs directly above the drain invites roots into the pipe. Keep large plantings away from the line.
Testing and maintaining the drain
After you finish, wait for a rain or run a hose near the start of the trench and watch the outlet. Water should begin appearing at the end of the pipe within a reasonable time. If nothing shows up, check for a blockage, a pinched pipe, or a section that dips.
Over the years, keep the outlet clear of leaves and debris and check it after big storms. If water stops flowing from the outlet even when the yard is clearly wet, a drainage professional can flush the line or inspect it with a camera.
When the job is bigger than a weekend
Not every wet area is a good DIY candidate. If water is entering your basement, if the drain has to run beside a foundation, or if you aren’t sure where the water can legally go, a contractor is worth consulting. They can look at grading, gutters, and soil type, and sometimes the right answer is a simple fix like extending a downspout rather than digging a long trench.
If you do tackle it yourself, take your time with the slope and the outlet. Those two details decide whether the drain keeps your yard dry for years or just looks tidy until the next heavy rain. After the first big storm, go outside, watch the water leave, and you’ll know you built it right.